Some months ago I created a D3js projection, and published it to NMP and Bower. I wanted to use the opportunity to learn about Nodejs, NPM and so on. I write this post to remember all the steps I followed, and maybe is interesting for someone else.
The final code
The library I will talk about is explained in the [original d3-composite-projections post][d3-composite-projections post]. You can download it or take a look to the code at the [project’s GitHub page][github page]. If you already know how to use npm, just type npm install d3-composite-projections.
I won’t talk about the code itself, but about the tools I used to create it.
Creating the nodejs project
To create a Nodejs project, the first thing is [installing Nodejs][installing nodejs], of course. In the same step, [npm][npm home] will be installed.
The first thing is initializing the project:
npm init
This will prompt some questions and save the information into a file called package.json. You can change the file whenever you want, so mistakes are not very important.
This package.json file is important to publish the project, since it holds some information, but also for personal use, because stores the information about the dependencies of the project. You only keep your code, and using the command
npm installall the dependencies will be downloaded.
To add a dependency, one of the following:
npm install name_of_the package
npm install --save name_of_the package
npm install --save-dev name_of_the package
- The first will install the dependency, but won’t store it into package.json, so using npm install won’t work in the future installations.
- The second options saves the dependency into the dependencies section, so it will be always downloaded
- The third option will save the dependency into the devDependencies section. This allows to avoid downloading them when you only want to use the library, without developing it. For instance, when other software depends on your library, those won’t be installed.
Managing the workflow with gulp
A task manager is very useful when working with node. Since I’m not using an IDE like Eclipse or NetBeans, all the tasks are run from the command line, and when the project grows a little, running all the commands can be long. Gulp helps you to do all this automatically creating what they call tasks. The tasks use streams, which are remember me a little the unix pipes.
To [install gulp][gulp-install], you have to type:
npm install --global gulp
npm install --save-dev gulp
This will install the dependency at the package.json file.
Now, a gulpfile.js is needed to run gulp. A minimal one would be:
var gulp = require("gulp");

gulp.task("default", function () {
  // place code for your default task here
});
Run it by typing gulp. The task is named default, and is the one run by gulp if no parameter is given. If a task named foo is set, you can run just this one by typing gulp foo. This is useful if there are many tasks and you don’t want to run them all.
Gulp has many many plugins, that make almost everything you need to manage your files: testing, minifying, linting, moving, uploading, etc. Each plugin has to be installed using npm install —save-dev plugin_name.
Let’s see some tasks from the [project gulpfile][gulpfile]:
gulp.task("build", function () {
  return gulp
    .src(["./src/*.js"])
    .pipe(gp_newer("composite-projections.js"), { extension: ".js" })
    .pipe(gp_strip())
    .pipe(gp_concat("composite-projections.js"))
    .pipe(gulp.dest("./"))
    .pipe(gp_rename("composite-projections.min.js"))
    .pipe(gp_uglify())
    .pipe(gulp.dest("./"));
});
This is one of the most common tasks. It takes several source files, removes the comments, merges them and, finally, minifies the resulting file.
- gulp.src sets the source files. In our case, all the files under the src folder
- gulpnewer adds a condition: Only act if the source is newer than the _composite-projections.js file
- gulp_strip removes the comments so the output file is smaller
- gulpconcat merges all the files in one, named _composite-projections.js. This will be the main file in our project
- gulp.dest sets the output folder to this stream. Now, the file is saved, but the stream is still open to do the following steps
- gulp_rename changes the name of the output
- [gulp_uglify][gulp-uglify] runs [UglifyJS][uglifyjs], which minifies the code, renaming all the variables, removing spaces and newlines, etc. so a compact and more efficient file is created
- gulp.dest will save this new minified file too
To build again the file, just type gulp build. Of course, usually we want to run several tasks at once, and the tasks have their own dependencies too. Those dependencies are set this way:
gulp.task('test', ['build', 'build_separated', 'get_sample_data'], function(){
return gulp.src('./test/test.js', {read: false})
.pipe(gp\*mocha({reporter: 'nyan'}));
});
This task, that will test the files as we’ll see later, requires the tasks ‘build’, ‘buildseparated’* and ‘get_sample_data’ to be run before it starts. It’s logical, since no test can be done if the final file isn’t built and the needed data is available. I like this method, since you only take care of the dependencies for each task, and the system decides what to run depending on the calculated final dependencies, which can be complicated.
Usually, the default task will have several dependencies, so they run all, and in parallel when possible. The default task itself can be void:
gulp.task(
  "default",
  ["lint", "build", "build_separated", "test", "license_year"],
  function () {}
);
There are several libraries similar to gulp, [grunt][grunt] is the most popular. I chose gulp after looking some comparisons, and because it was the last hype. I’m happy with it, but the others seem nice too.
Linting the code
Using a [lint program][lint] helps to code better by maintaining a nice code, using a good number of methods in the classes, etc. [JSHint][jshint] is a program that flags suspicious usage in programs written in JavaScript. It can be used with gulp, by installing the gulp-jshint plugin. The created task looks like this:
return gulp
  .src("./src/*.js")
  .pipe(gp_jshint())
  .pipe(gp_jshint.reporter("default"));
Which will run for all the files under the *src* folder (the original ones, with all the comments). Let’s see an example, if I change
return (
  y >= -0.10779 && y < 0.067673 && x >= -0.1866 && x < 0.0255
    ? canaryIslands
    : iberianPeninsule
).invert(coordinates);
to
return (
  y >= -0.10779 && y < 0.067673 && x >= -0.1866 && x < 0.0255
    ? canaryIslands
    : iberianPeninsule
).invert(coordinates);
I’ll get messages like:
src/conicConformalSpain-proj.js: line 54, col 23, A leading decimal point can be confused with a dot: '.10779'.
Sometimes, there are errors that you can’t (or dont want to) avoid. In my case, I got the message:
Expected an assignment or function call and instead saw an expression
I google it and found a [nice explanation and solution][jshint-solution], which is adding:
/_ jshint -W030 _/;in the function. I didn’t change the code, since it was taken from the original Mike Bostock’s one, and if he says it’s better this way, I won’t change it.
Testing with mocha
Wether you want to use the [test-driven developement][tdd] process or just test some results to your functions so the changes you make don’t give wrong results, you need a test framework. [Mocha][mocha] is one of the available ones. It’s got a gulp plugin too, so it can be integrated to the project without problems.
First, I made a test directory to put all the test stuff. Then, installed mocha:
npm install -g mocha
npm install --save-dev gulp-mocha
Now, you can run mocha from any project, or integrate it in your project. The tests are in the ./tests/test.js file, which looks like:
var assert = require("assert");
describe("Array", function () {
  describe("#indexOf()", function () {
    it("should return -1 when the value is not present", function () {
      assert.equal(-1, [1, 2, 3].indexOf(5));
      assert.equal(-1, [1, 2, 3].indexOf(0));
    });
  });
});
You can create as many tests as you want under describe and sub-tests under it.
In the case of d3-composite-projections, I found two things a bit more difficult to test. One is creating a sample svg file for each projection without using the browser. I explained how to do it in the post [Creating maps using D3js and nodejs][creating maps using d3js and nodejs].
The other is using the created javascript files without including the libraries in the code. Using d3js with node implies requiring it at the begining with require('d3');. But my generated file doesn’t have that. [I found my solution at Stackoverflow][stackoverflow solution]. Basically, you load the modules at test.js and pass it to the file as the context. In my example:
var execfile = require("./execfile.js");
var d3 = require('../node*modules/d3/d3.js');
var composite_projection = execfile(\_\_dirname+"/../composite-projections.js",
{d3: d3, console: console});
This will allow the functions in composite-projections.js to use _d3* ant the console if necessary.
Mocha can do many other stuff, I have only used a very small part of it.
Publishing the code at GitHub
The code must be published somewhere if you want to share it. The most popular place right now is GitHub, and the other tools will go there to get the code.
You can either clone an existing repository before creating the code
git clone https://github.com/user/repo.git
or, if you already have the code, create a repository at GitHub and then:
git init
git add .
git commit -m "First commit"
git remote add origin https://github.com/user/repo.git
git remote -v
Changing the address to the created repository.
You can now change the package.json file adding the new repository, so NPM can work. In the case of -d3-composite-projections, the lines are:
"repository": {
"type": "git",
"url": "https://github.com/rveciana/d3-composite-projections.git"
},
"bugs": {
"url": "https://github.com/rveciana/d3-composite-projections/issues"
},
Note that GitHub has a nice issues page for the projects, and that it can be linked here.
I added many directories at the .gitignore files to avoid filling the repository with temporary files.
Publishing with NPM
Now that we have a good library, we can publish it to npm so other people can use it from nodejs. The first thing is to fill ahe empty fields you amy have at your package.json with the GitHub address, licence, etc. There are some [tutorials about how to so it step by step][npm-tutorial].
npm adduser / npm login (use the second one if you already have a user)
npm config ls
npm publish
npm version <update_type>
git push --follow-tags
npm publish- You have to either create a user or set your existing user to the project.
- config ls will test if the user is set properly
- publish will publish if everything is well configured
- If you want to publish a new version, you have first to create it using version. The package.json file will have a new version, and the git repo will be tagged with the new version too. The update types are: ..1. patch: v0.0.1 will become v0.0.2 ..2. minor: v0.0.1 will become v0.1.0 ..3. major: v0.0.1 will become v1.0.0
- You have to push the new tag to GitHub
- Now you can publish the package again
I made many errors doing all this (plus changing the Bower version), so I put it into a gulp task:
function inc(importance) {
  return gulp
    .src(["./package.json", "./bower.json"])
    .pipe(gp_bump({ type: importance }))
    .pipe(gulp.dest("./"))
    .pipe(gp_git.commit("Creating new package version"))
    .pipe(gp_filter("package.json"))
    .pipe(gp_tagversion());
}

gulp.task("patch", function () {
  return inc("patch");
});
gulp.task("feature", function () {
  return inc("minor");
});
gulp.task("release", function () {
  return inc("major");
});
gulp.task("push", function () {
  gp_git.push("origin", "master", { args: " --follow-tags" }, function (err) {
    if (err) throw err;
  });
});- The bump plugin will increment all the version tags in the indicated files (bower.json and package.json) with the indicated type
- Then, the [gulp-git][gulp-git] plugin will commit the changes
- gulp_tagversion sets a new git tag with the same value set in package.json
Publishing with Bower
[Bower][bower] is a tool to manage the dependencies at a web site. It keeps a track of the libraries and its versions your site depends on. Since d3-composite-projections is intended to be used in a web with d3, it’s interesting to publish it at bower so people can use it in their projects. They have a [nice tutorial on creating a package][bower creation]. Basically, for this project:
bower init
bower install d3 --save
bower register <my-package-name> <git-endpoint>
- init will prompt some questions and create the bower.json file, as npm init did
- The install system is identical to the npm one
- Register uploads the project to bower. This works slightly different from npm, since bower will look at GitHub directly for new versions, so there is no need to interact with it any more, just remember to change the tag in the bower.json file
Continuous integration with Travis
[Travis CI][travis home] is a continuous integration tool that works very well with node.js and GitHub. It builds and tests all your files each time a commit is pushed to GitHub, and can even deploy the changes to NPM automatically only if everything goes well.
The first thing to set up Travis is to create your account. You can do it directly from GitHub, who will ask you a permission. Then, you can take the three steps shown in this image:
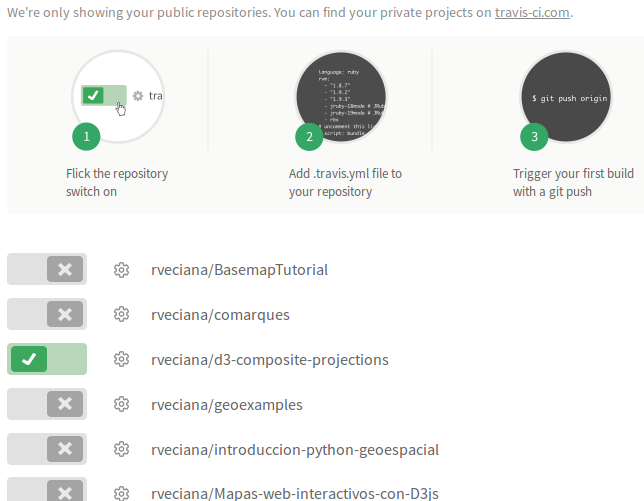
- Select the project you want to link
- Create the .travis.yml file. In our case, use the [Travis javascript tutorial][travis node], and specifically the [Travis gulp section][travis gulp]
- Publishing any commit will run your project at travis
Since I was using a nodejs version higher than 4, [this section][travis node4] applies too. It may seem complicated, but the resulting file is quite simple:
language: node_js
node_js:

- 5.2.0
  before_script:
- npm install -g gulp
  script: gulp
  env:
- CXX=g++-4.8
  addons:
  apt:
  sources: - ubuntu-toolchain-r-test
  packages: - g++-4.8
To automatize the NPM publication, you can use the travis command line. First, install it [using this instructions][travis client]. Then, just type
travis encrypt YOUR_API_KEY --add deploy.api_key
travis setup npm
The API key can be found at ~/.npmrc and must be encrypted with the first command. The second command will add the configuration at your .travis.yml file. You just have to answer the questions. You can find more information in [this tutorial][travis npm]. My final deploy section looks like this:
deploy:
provider: npm
email: rveciana@gmail.com
api_key:
secure: EncryptedAPIKey
on:
tags: true
repo: rveciana/d3-composite-projections
The tags: true tag makes travis to deploy to NPM only if a tag has been changed, so other commits I may push will run the tests but won’t change anything at the NPM repository.
When you go to the [travis project page][travis project page], you will find a small image like this:

[![travis image][travis image]][travis project page]

you can insert it into your README.md file or wherever you want so people can know if the last version is giving a good build result.

[npm home]: https://www.npmjs.com/
[installing nodejs]: https://nodejs.org/en/download/
[gulp-install]: https://github.com/gulpjs/gulp/blob/master/docs/getting-started.md
[gulpfile]: https://github.com/rveciana/d3-composite-projections/blob/master/gulpfile.js
[gulp-uglify]: https://www.npmjs.com/package/gulp-uglify
[uglifyjs]: https://github.com/mishoo/UglifyJS
[grunt]: http://gruntjs.com/
[lint]: https://en.wikipedia.org/wiki/Lint_%28software%29
[jshint]: http://jshint.com/
[jshint-solution]: https://jslinterrors.com/expected-an-assignment-or-function-call
[mocha]: https://mochajs.org/
[tdd]: https://en.wikipedia.org/wiki/Test-driven_development
[creating maps using d3js and nodejs]: /d3/2015/05/29/d3-maps-nodejs.html
[stackoverflow solution]: http://stackoverflow.com/a/8808162/1086633
[npm-tutorial]: https://docs.npmjs.com/getting-started/publishing-npm-packages
[gulp-git]: https://www.npmjs.com/package/gulp-git
[bower]: http://bower.io/
[bower creation]: http://bower.io/docs/creating-packages/
[travis home]: https://travis-ci.org/
[travis node]: https://docs.travis-ci.com/user/languages/javascript-with-nodejs
[travis gulp]: https://docs.travis-ci.com/user/languages/javascript-with-nodejs#Using-Gulp
[travis node4]: https://docs.travis-ci.com/user/languages/javascript-with-nodejs#Node.js-v4-%28or-io.js-v3%29-compiler-requirements
[travis npm]: https://docs.travis-ci.com/user/deployment/npm#stq=&stp=0
[travis client]: https://blog.travis-ci.com/2013-01-14-new-client/
[travis project page]: https://travis-ci.org/rveciana/d3-composite-projections
[travis image]: https://travis-ci.org/rveciana/d3-composite-projections.svg?branch=master
[d3-composite-projections post]: /d3/2015/05/12/d3-composite-projections.html
[github page]: https://github.com/rveciana/d3-composite-projections